The Mountboard Square is useful for tracing the guiding lines for cutting the internal holes of mountboards and the position marks for decorations on mountboard corners.

The Mountboard Square was designed and built by Rinaldin. It has become one of the most popular tools for framers. The video, which you can see clicking here, has so far had about 85,000 views.
The Mountboard Square can perform two functions:
1) To trace the guiding lines for cutting the internal holes of mountboards;
2) To trace the position marks for decorations on mountboard corners.
Tracing the guiding lines for mountboard holes
First of all it is necessary to have a working bench with a higher edge. This can be easily prepared by appling a wooden fillet on the bench edge. Otherwise it is possible to buy from the Rinaldin firm a square support made of a masonite panel with a higher edge. Framers can also build a similar support by themselves.
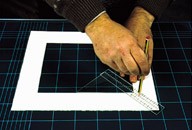
The paperboard has to be placed against the higher edge of the working bench with its face down so that the lines used for cutting can be drawn on the paperboard back. Then the square is placed on the paperboard in such a way that its base may slide along the higher bench edge (as shown in the pictures). The tiny holes on the square show the distance from the base. If, for example, you want to trace a 70 mm large mountboard you have to place your pencil on the hole at 70 mm from the base. Then it is enough to pull the pencil which will drag the square along the edge and, at the same time, will draw the line. At this point you only need to repeat the same operation on the other sides of the paperboard.
By gaining experience you will realize that it is not necessary to draw the entire lines but it is enough to trace small intersecting lines where the mount internal corners will be. Besides you can use the square to create mountboards with sides of different width. For example, the shorter sides of the mountboard can be wider then the longer ones. Or you might want the mountboard to be wider in the lower side. Whatever width you desire, all you have to do is to place your pencil in the corresponding hole of the square and trace the lines.
The square is particularly useful when mountboards are octagonal, hexagonal, triangular or of any other shape. In fact, the lines drawn will always be parallel to the external sides of the mountboard.
Moreover, the square can be used also by left-handers because it can easily slide both on the right-hand side and on the left-hand side.
The mount square is not always necessary with bevelled cardboard because standard professional cutters do not require guiding lines for the mount holes. Nevertheless the mountboard square is necessary for tracing the guiding lines when using semi-professional cutters.
Tracing the position marks on the mountboard corners
The square can also be used for tracing position marks on mountboards. The marks are then used as a reference or as a guide when applying decorations. Nevertheless, the marks must not be visible for they are traced on the front part of mountboards. Therefore they must be very small and must be drawn with a pencil in order to be erased later on.
The square has to be placed against a corner in the internal side of the mount. The part of the square that goes over the mount is equipped with several small holes, placed at 2.5 mm one from the other. After deciding the distance the decoration will be applied at, a pencil is placed in the corresponding hole to trace a position mark. It is possible to trace more than one position mark if one wishes to apply parallel decorations.
Mount decorations can be of various kinds: golden lines traced with a pen, self-adhesive decorative tapes, decorative rub-downs, coloured lines painted with a water-colour technique (French matting) or with powders, with acrylic colours and so on.