There are various types of glass. Let us see the most common ones used in the framing.
Glass is fundamentally made up of three base elements referred to as oxides (substances that contain oxygen):
Silicon dioxide that allows glass to solidify
Sodium dioxide that facilitates the melting of the glass
Calcium dioxide that protects the glass from corrosion.
The fundamental characteristics of glass can be modified by adding other materials to it in order to make it harder, more resistant to heat, more colourful, etc.
Simple glass
The most commonly used thickness of glass for frames is 1.6 to1.8 mm (1/16" to 1/14"). For frames bigger than a sq. meter (sq. yard) it is advisable to use a thickness of 3 mm (1/10"), the so called semi-double glass. It must be remembered that thicker glass is also heavier. The solidity (strength) of the frame therefore has to be in proportion to the weight. For clip frames 2 mm (5/64") thick glass is generally used as it is does not break as easily.
1.6 to 1.8 mm (1/16" to 1/14") thick glass is generally sold in wooden cases weighing approximately 500 to 600 kilograms (approx 1 ton). In each individual case there are approximately between 100 to 150 sq. meters (1000 to 1600 sq ft) of glass. Transport is achieved using appropriate machinery such as cranes for the loading and unloading. Smaller framers or starters that are not yet able to buy whole packs can go to glassmakers where they will be able to buy loose sheets. The prices are obviously higher per sheet of glass.
The framer has very limited use of thick sized glass (3 mm) (1/10") and it is not worthwhile for him/her to purchase an entire case. It is preferable then to purchase the pre-cut sheets in desired measurements of the frame. To avoid errors it would advisable to take the frame directly to the glassmaker in order to have them measure it for themselves.
Some manufacturers insert a sheet of paper between one sheet and another; others keep the sheets separated by using appropriate powder; others use a combination of the two. The first system is slightly dearer but more advisable for the framer. Powder creates some subsequent problems for both the cleaning and the cutting.
For glass that is 1.6 to 1.8 mm (1/16" to 1/14") thick the standard length is (in Europe) generally 184 cm (approx 6 ft). The width can vary from approx. 40cm (16") to anything up to 120 to130 cm (4' to 4' 3"). Thicker glass is supplied in bigger sizes.
Some bigger glassmakers or wholesalers can supply pre-cut glass in standard measurements such as 40 x 50 cm or 50 x 70 cm (16" x 20" or 20" x 28"). If the framer often makes use of standard measurements then he/she may find this purchasing method convenient.
Depending on the manufacturing procedure glass can be classified into pulled glass and floating glass. Pulled glass that is obtained using the traditional method is slowing disappearing from the market. Floated glass is completely free of all the defects found in the production of pulled glass.
Antiriflexion glass
It is glass that has been treated with an acid solution on one or both faces, a type of grounding that doesn't allow the glass to reflect. Reflection from glass can be annoying especially when the light's source (window or light-bulb) is behind the person observing the picture.
The antiriflexion glass has the characteristic of reducing the transparency of the object on the other side of the glass as one gets further away from the glass. Hence it is suitable for pictures that are pushed up against the glass but not for pictures that are distanced from the glass. In particular it can be suitable for photographs and prints that are framed without a bevelled mountboard. Though if a mountboard of approx 1.5 cm (1/6") or any other separator/distancer is inserted the transparency is reduced.
There are many types of antiriflexion glass with various different characteristics. In the USA there is antiriflexion glass that also has the characteristic of pushing away ultraviolet rays enabling a greater protection of framed works of art.
Antiriflexion glass costs twice than normal glass and isn't normally stocked by glassmakers. The framer has particular difficulty in finding it in smaller city centres.
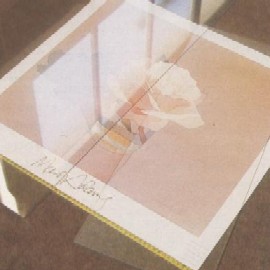
Normal glass and Antiriflexion glass
Anti ultra-violet ray glass
It avoids the passing of ultraviolet rays that damage the colours of works of art on paper and is quite commonly used. Use of appropriate plastic glass can be used to protect pictures from ultraviolet rays.
Plastic glass
It is polystyrene or other similar acrylic materials and can be used effectively instead of glass in many circumstances.
The advantages are:
Weight - About half as much than glass
Unbreakable - The picture is much more easily transported. Plastic glass reduces the danger of cuts due to the breaking of glass and hence becomes a necessity in all public places such as schools, kinder gardens, hospitals, offices etc.
Resistance to Ultraviolet rays - This characteristic can vary depending on the type of plastic glass and needs to be verified with the manufacturer.
Greater flexibility - Useful especially when wanting to frame either pictures that are not perfectly flat or the need to frame objects.
Ease of drilling and working with - This is very useful for framing objects into transparent containers. The polystyrene in these cases can be welded with acetone.
Doesn't assist the forming of the condensate (opposite to glass).
It is thermoplastic and changes with temperature. Hence it can be easily bent.
The disadvantages are:
More difficult to clean - It should be able to be cleaned using normal detergents but also using a special antistatic agent.
It is more easily scratched.
More difficult to store because the protective film tends to come off especially when being cut
More difficult to cut - The cut is made with an appropriate tool or with a saw. Compared to glass the cutter needs to go over the score more times in order to obtain a deeper score on the glass. Stronger force is then needed in order to break off the glass.
It is more electrostatic than glass and hence attracts more dust.
The fact that it is more thermoplastic can have negative consequences. It tends to bend if exposed to the sun or if it is close to heat. It is not advisable to use on the external part.
Glass's defects
Oxidation
It is a chemical process that occurs when, for a certain period, glass remains in a humid environment or is exposed to the sun. The oxidation displays itself with stains that are greater or less matt. There is no way to eliminate these stains.
In order to avoid that this occurs it is necessary to keep glass in a dry environment. If during transport glass gets wet you should refuse to accept delivery. If you accept it would be advisable to use the glass immediately or at least open the case in order to dry the glass.
Fragility
It can happen that glass is excessively fragile to cut and it breaks too easily. In this case you could also contest the supply.
Excessive hardness of the glass
This is the opposite defect. Glass with this defect is equally difficult to cut.
Waviness
Glass can display some waves especially if obliquely illuminated. In this case it is not a matter of defect - it is low quality glass. It is a characteristic of various glass imported from third world countries at low prices. In spite of the low price it is not advisable to use this glass for picture frames as it is not pleasant to look at. It is hence necessary to be careful at the time of purchasing in order to ascertain the type of glass and its origin.
Lack of flatness. Consists of the fact that the sheets are not perfectly flat but have a convex face. This glass is generally difficult to cut.
Imperfect squareness
Sheets that are not exactly square require a longer cutting time and create a greater waste of material. If a framer doesn't notice the imperfect squareness he/she will have an unpleasant surprise when inserting the picture into the frame.
Lack of uniformity in the measurements
The standard length is 184 cm (6 ft). It can happen though that some sheets have different measurements. It would be best not to take this for granted and to check the measurements especially before making any mass production cuts. The same can be said for the thickness. The sheets could have slightly different thicknesses. The lack of uniformity in the dimensions can have serious consequences especially for those performing mass production cutting.
"Eyes" on the glass
Found almost exclusively on pulled glass. They are due to small parts of material or migrated by mistake into the glass during fabrication. Float glass is almost exclusively free of this defect.
Scratches on the glass
Generally this defect is created not during manufacturing but in a subsequent phase. It can be blamed for example on the wholesaler or glassmaker that sold us the glass. This defect can be partially hidden by placing the scratched part on the inside of the frame. It will be less noticed especially when it is in contact with the picture in a position such that the scratch can be mistaken as being part of the picture itself.
This reasoning is particularly valid when the client requests to use the old glass with a new frame.
Glass or non glass?
Glass is often used to frame all types of pictures: prints, paintings, watercolours etc. But not every one agrees on this point. Whilst for pictures on paper there is no disagreement, for paintings there are different opinions. Many think that oil paintings should not be framed with glass.
We will discuss what the different opinions are and what the inconveniences are for framing with glass.
Condensation - It occurs in humid conditions and lack of ventilation. It is necessary to avoid putting important paper or canvass works of art on against the glass.
Reflexions - The top smooth surface of glass reflects light towards the person that is observing the picture. In dark pictures the glass actually can and does becomes a mirror.
Danger - The danger is due to the possibility of cracking. In some situations it is advisable to substitute it with plastic glass.
How to stock glass
Trucks that transport glass have cranes that are used for the unloading of the cases. The case, once unloaded, can no longer be moved by the framer due to its enormous weight. It can only be lifted with a fork lift or with a transpallet, equipment that a framer rarely possesses.
It is then necessary to either have the case left in a more permanent position or have it opened so that the sheets can be taken out and placed in their appropriate place.
If the final solution is adopted then it is advisable to have a wooden wedge placed under the case so that it slightly leans making the removal of the sheets an easier task. It is necessary to make sure that the case is protected from humidity and mainly from rain during the period of loading and unloading and subsequent removal of the sheets otherwise the glass could oxidate.
If the framer has trolleys to move the sheets then he can unload the case directly onto the trolleys and hence avoid the transferring of the sheets. The case could stay in the trolley until it is emptied.
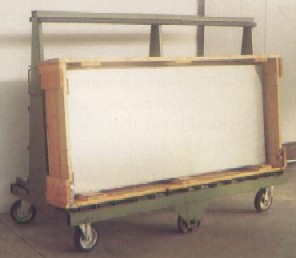
The case with the glass on the cart
Often the delivery service by the glass vendor includes the moving of the case into the framer's workshop utilizing appropriate small trolleys. If there are steps or stairs in the workshop then the trolley cannot be used.
Most framers lean the case horizontally against the wall. The sheets are then removed directly from the case. Many framers cut the sheet without taking it out of the case leaning the straight edge on top. Only the other side of the sheet is cut on the workbench or inside the frame.
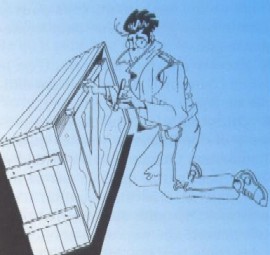
Glass cutting directly from the case
If the framer has plenty of storage space he could consider the purchase of different sized cases in order to optimize the cut and hence have less waste. It would be preferable to cut the sheet long ways in different sizes so that all common sizes are readily available to be cut. In this case the sheets could be stored vertically in strong wooden or metal shelves. The framer could prepare and keep readily available the most common sizes 20 x 25 cm or 45 x 60 cm (8" x 10" or 18" x 24") etc. It would be useful for the framer to reduce most pictures that are to be framed, to standard sizes.
Often playing around with the dimensions of mountboards pictures that do not have standard measurements can be made so. This way the framer can prefabricate both the glass and the cardboard support. The work would be done in sets and the waste would be almost totally eliminated. If the framers keeps standard pre-cut sizes they should be stocked in as little space as possible and in the most organised manner.
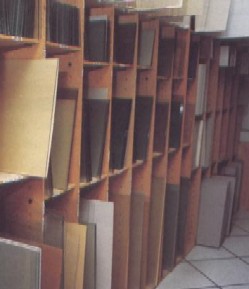
How to store the glasses on the shelf
It is absolutely unadvisable to place the sheets on either concrete, tiles or any other rigid floor as they would be easily prone to accidental cracks. Glass is to be stocked on supports made of wood, chipboard, cardboard etc. i.e. on slightly soft surfaces. It is important that the area where the glass is stored is periodically cleaned from glass fragments that tend to fatally form. These fragments are often the cause of glass cracking.
Equipment
The glass cutter
Diamonds were once used. They were expensive and very fragile. If they accidentally fell they were no longer usable. Even up until 40 years ago some old fashioned glassmakers were still using them. These days they cannot be found.
An improvement for the glass cutter with wheels is the oil glass cutter with
tungsten wheels that have really taken over the market in the last 30 years.
Its
feature is the continuing lubrication through a straw that enables the oil to
flow from the tank that is in the cutter's handle. Fletcher, an American
company, claims to be the inventor of the oil glass cutter. At the moment though
the most well known is the Japanese type "Toyo" which happens to also be the
best.
Many types exist depending on the cutting requirements in the plastic transparent handle version or the metal handle version (code 202 and 203 in Rinaldin catalogue). In the first case there is the possibility of seeing the oil level whilst in the second greater importance is given to the solidity of the cutter. There is a changing block that is replaced when the wheels are worn. Its cost is not much less than the entire cutter (code 204 in Rinaldin catalogue). It is for this reason that there is the use and dispose of version on the market.
The duration of the oil cutter depends obviously on its usage. For an average framer it can be estimated to last about 6 months.
All types require a certain amount of care in order to avoid dropping on the ground for example which would damage the wheels. Even letting the glass cutter fall on the workbench could be damaging for the wheels.
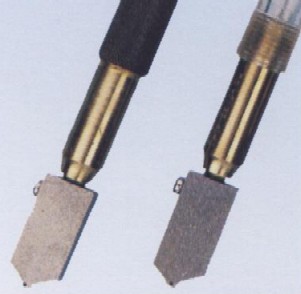
The glass cutters Toyo
The glass cutter should not have faults. The major defects could be:
• The wheel is too used. This is noticeable when it requires too much pressure to use.
• The score has intermittent gaps.
• The score is too deep
• The score leaves too much glass dust.
• The glass cutter tends to slip on the glass without scoring
In all these cases it would advisable to replace the wheel.
The straight edge
The glass cutter has to be guided by a ruler or with a straight edge in order to obtain a straight cut. At the moment there is a tendency to manufacture straight edges in one whole piece in order to avoid squaring imperfections. It is convenient for the framer to keep 2 sizes of straight edges. One smaller and one bigger. It would be unpractical to cut small glass with straight edges that are too bulky.

How to use the straight edge
There is another type of straight edge used for the longitude cutting of the sheets. This straight edge can be used even for mass production cuts of many sheets of the same size.
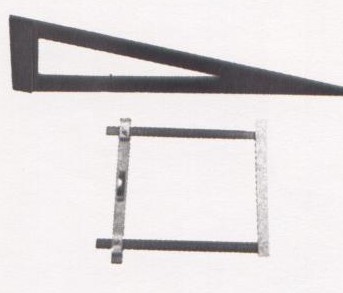
The straight edge for glass cutting
The table
The table should be at least 190 cm long i.e. the length of the sheets (cm 184). The width should be at least a meter (40") or possibly 120 cm (50"). The height of the table should be in proportion to the height of the worker. It must be considered that the worker should be able to lift and lay on the table sheets of about 120 cm wide (50"). In some circumstances it would be useful to have a footboard under the worker's feet.
The table must be covered with felt or some other soft but not too soft material. Even a old blanket could do. There are sophisticated professional tables available on the market. They would possibly be too bulky and expensive though for the average framer.
The table should be cleared often of all glass fragments that remain on the table. The clearing can be done with a circular brush like those used in restaurants for collecting bread crumbs from the tables.
There should be a bin or box left next to the cutting table. Every so often it would be advisable to break the pieces in the bin in order to reduce the space they are occupying. Left over that are long and thin and do not enter into the bin should firstly be broken (with pliers or with a glass cutter).
Pliers
There are specific pliers available on the market for glassmakers. But they are tailor made for thick glass. The framer can use any pair of pliers that can be bought in a hardware store. The pliers are used to remove thin strips of glass. They are also used to remove pieces of glass that have remained attached to the sheet of glass. They are also used to gin the edge of the sheet i.e. to take off the small parts of glass that have been left with the knurled part of the pliers (code 217 in Rinaldin catalogue).
One particular type of pliers are the Fletchers. They are made of a plastic material and have a big advantage in that they are light and hence do not tire the hand.
Their lighter weight also means that in case they are accidentally dropped onto the sheet of glass there is less chance of the glass breaking. A special characteristic of these pliers is to have two interchangeable jaws with two protrusions sporgenze on the top and a central protrusion on the bottom side. The pressure of them on the glass, at the extremes of the score, enables the sheet to more easily detach.
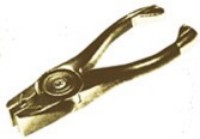
The piler Fletcher available at Rinaldin (code 217)
The meter
The wheel meter (flexometer) is the most comfortable as it is able to be applied to the extreme side of the sheet. It would be even more comfortable fixing the meter to the side of the table with a stop.
The grinding
There are many different types of machines available on the market able for grinding glass that are more or less automatic. For the framer needs they are not necessary. It is sufficient to use a manual carborundum grinder (code 219 in Rinaldin catalogue).
It is preferable to wet the grinder before using.
Other grinding systems are shown in the video that you can see by clicking here

The grinding
The case opener
In order to open the cases an appropriate tool in a "Z" shape that has the ends flattened is very useful. It is available in any hardware. (code 247 in Rinaldin catalogue).
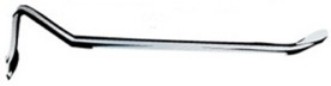
The case opener
A vertical cutter
In the United States they are very popular.
The advantages of these vertical cutters is that they allow a perfect cut of the glass without any practice. If you are not sure of your own ability or you haven't got time or the willingness to have your staff trained then this cutter is ideal. The cutter is very useful for those that already have practice in the use of a manual cutter especially for mass production cuts it reduces time dramatically. Another advantage, that is not to be disregarded, is that it there is space savings to be had by cutting vertically.
The majority of cutters on the market are also able to cut cardboard, paperboard, plastic materials, foam polystyrene sheets etc.
Rinaldin proposes A vertical cutter "Gladium", that is provided in three versions.
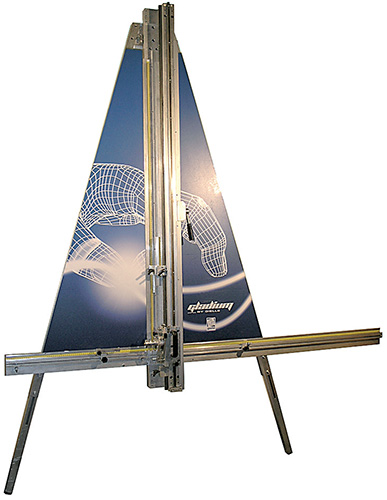
A vertical cutter Gladium
Working the glass
The cut
In order to cut the glass well a certain amount of practice is needed. You need to get the "hang of it".
Don't worry if your first cuts are not perfect or you crack some sheets. Get some practice first on some smaller cuts.
Use a soft pointed felt pen to mark the scoring line.
If using a straight edge then there is no need to make 2 marks at both ends of the proposed cut. If though you are not sure of the exact squareness of the sheet or of the straight edge itself then it would be prudent to make two marks.
The cutter is uniformly pulled towards the worker at constant pressure, not too slowly and not too quickly. If the cut is made quickly then the pressure applied can be lessened. Generally the quicker the cut, the better the cut. Contrary to what seems logical, there is no need to apply more pressure to obtain a good cut. The score has to be clean and sharp. If some fragments or dust form on the score then it means that the pressure is too strong. The glass in this case will break-off but the edges will be ragged and weak.
There is no ideal way of grasping the cutter. Each one of us can use chooses the system that best suits them. The most common system though is by holding the index finger on top of the cutter and the thumb and the middle finger should be placed respectively to the right and left of the cutter. Just be careful not to hold the cutter like a fountain per as its leaning position might make it such that the wheel then come into contact with the glass.
One must also be careful that the position of the wheel, irrespective of the position of the handle, stays in a perfectly vertical position without right or left oscillations (see figure).
When the cutter reaches the end of the sheet and the wheel has already gone over the end of the sheet it could happen that the cutting block goes on to the sheet and chips it. This particularly happens with starters that are too slow. This can be overcome by putting a piece of cardboard at the end of the sheet so that the wheel continues its path for a few centimetres on the cardboard.
If you use an oil cutter remeber to keep oil in the tank.
The glass must be clean. Sometimes the cases arrive without paper between a sheet and another. Instead of paper there is a type of dust that can impede a perfect cut.
In these cases there is a necessity to clean the area of the glass on which the score will be made.
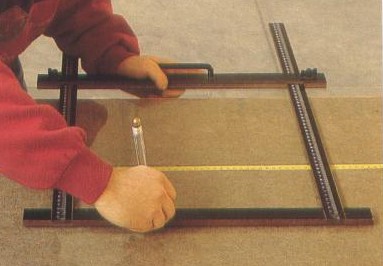
As a guide for the cut either a ruler or a ruler can be used. Whilst one hand is holding the cutter, the other must firmly hold the straight edge. For huge sheets the cut can be made at different steps but without ever taking the cutter off the glass or your hand off the straight edge. You can go forward with the cut by alternating the advancement of the cutter and your hand along the straight edge so that both your hands are at about the same level. In fact if the two hands are at two different levels then the pressure of the cutter against the straight edge wouldn't find any resistance and could move from its initial position.
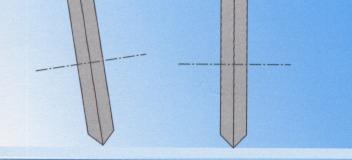
Section of the vertical and oblique scroll wheel
For larger sheets it is necessary to use a ruler instead of a straight edge. Never go over the same score twice or cut across other scoring lines; it could easily damage the wheel and would also obtain a defective cut. Sometimes the sheet can display a flaw. The flaw line will tend to continue in an erratic manner in a direction dictated by the tension it receives. If the flaw is at a corner of the sheet then it is advisable to use your fingers to deviate the flaw away from its initial direction towards the external edges of the sheet. This way only a small portion of the sheet will be lost. Not all framers know that the score made from a cutter tends too crytalize ("heal") after only a few minutes. From a physic's point of view what the score does is parallel align the glass's atoms along the borders of the score. After a few minutes the atom's alignment is no longer and hence the greater difficulty at breaking off the glass. Hence don't wait too long before breaking off the glass.
How to break off the glass
After having scored the glass place the sheet of glass in an appropriate position so that the scoring line is running slightly along the inside of the table's edge with the part to be broken off hanging over the side of the table. You obviously must hold the sticking out part otherwise it will fall due to its weight. Then push this protruding part with one swift movement so that you are able to obtain a clean separation.
Another system to detach strips of glass no wider than 20 cm (8") is to place your hands under and on either side of the score point of the glass hence slightly lifting the sheet. Whilst your hands are pressing towards the top, your two index fingers press towards the bottom until the strip is detached.
For bigger sheet it is preferable to insert the glass cutter or a pencil under the sheet at the extremities of the score and lightly press on either side of the score. This operation can be achieved by using special plyers manufactured by Fletcher (code 217 in Rinaldin catalogue). They have two protrudings on the top part and central one on the lower part. The central protruding presses from bottom to top whilst the two upper protrudings press from top to bottom.
Thin strips can be detached by using glass plyers or using normal plyers or even by using your hands.
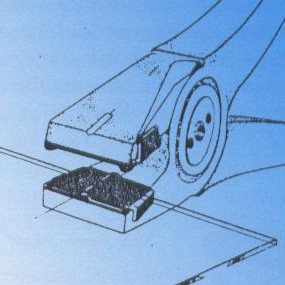
The cutting of the sheets longitudinally
Sometimes there is need to cut the glass long ways. It is an operation that requires lots of practice and cannot be done by a starter. The straight edge is used for mass production cuts by making run ?? along the edge of the sheet after having measured it (code 214 in Rinaldin catalogue).
In order separate the sheet it is necessary to grab the glass with both hands at the extremities of the sheet and drag it towards the edge of the table so that the score remains about 2 cm (1") on the inside of the edge of the table. At this point it is necessary to swiftly lower the part of the sheet that is hanging over the table. The sheet will detach but will remain on the table.
|
|
The cutting of oval or round glass
Oval or round glass can be obtained manually or with appropriate equipment. This is the procedure for manual cutting.
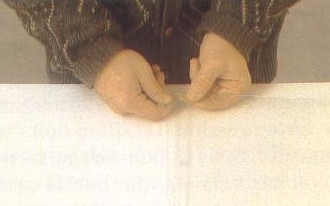
Turn the oval or round frameupside down.
On the back of the frame the glass is placed on top of it and fixed with adhesive tape on a few points of the frame.
The cut is performed by following the inside border of the frame. Naturally it is necessary that for glass to be slightly smaller than the frame so that it can enter without difficulty. It would be necessary for the cut to be performed without lifting the glass cutter from the glass so that the scored line is continuous without interruptions. This is not easy as it is necessary to walk around the oval. If the cutter is detached for whatever reason from the glass it is necessary to reposition it in the exact same spot as it left the glass.
If the oval frame has decorations that make the flat and level placing of the frame on the table difficult then it is worthwhile making the cutting marks on the glass itself. It is done this way: put the glass on glass on a flat surface and the frame on top of it facing upwards; with a felt tip pen mark the border of the frame so that a distinct oval line remains on the glass that will be used as a guide for the glass cutting.
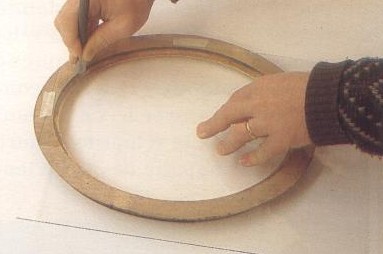
The cutting of oval or round glass
For the cutting of oval and round glass a greater pressure would be obtained by using the apposite cutting of oval or round glass (code 212 - 212G - 210 in Rinaldin catalogue, illustrated in this 2 video: video 1 and video 2). Generally these cuttings are also used for the cutting of oval and round mountboards; it is only necessary to change the cutting block.
Care must be taken to cut the glass on the outside of the oval and not on the inside as is done for the mountboard. It is the inside part of the glass that will be utilized and not the outside part that instead will be disposed of. It is possible to start the cut on a piece of paperboard so that the cutting wheel goes directly from the paperboard to the glass and hence already heading in the right direction.
After having made the score it is necessary to detach the glass so that the oval or the round part remain intact. This procedure is the same irrespective of using a manual or machine system of cutting.
The glass is turned around (so that the score remains underneath) on a rather soft surface and pressure is then applied with the fingers along the score line. This will detach the glass but won't free it from the rest of the sheet. In order to free it, it is necessary to make some release lines as shown in the figure and then separate the various pieces until the central part is freed.
One must be careful that the release lines are not perpendicular to the oval lines otherwise the release lines could continue into the central part. The outside release lines must not touch the oval or round line but must be slightly distanced by a 1-2 mm (1/20"). One alternative to release lines is four cuts that are almost a perfect continuation of the long sides of the oval. In this case it is also important for the lines to remain distanced from the oval lines.
This system is also valid for fan frame.

How to hack the glass to remove the ovals
The cleaning of the glass
There is no standard formula for cleaning. Each framer has his own preferences. There are those that suggest a 50/50 mixture of denatured alcohol and water.
There are those that simply use water and soap. The soap is placed on top of a spunge in a plate. Another slightly wet spunge is rubbed against the soap and then passed over the glass. The glass is then dried with a soft rag.
There are various detergents for glass on the market. Some of these could be harmful for conservation of framed works of art especially those that contain ammonia. Whatever the chosen solution it is probably easier to pour it into a spray bottle to then spray over the glass. Soft rags can be used for the drying. It is even more practical to use cellucotton paper making certain that down are not left in the glass.
It is above all important that the cleaning be performed at the last moment just before the application of the frame. If for instance after having cleaned the glass other work is done such as the application of the hanger you run the risk of attracting dust or other various fragments.
The cleaning operation can be done directly in the frame. After having cleaned one side of the frame, the glass is turned around in order to clean the other side. This system is very practical but has the disadvantage of attracting dirt and down on the edges of the glass and against the internal part of the frame and especially in the corners. This dirtiness could appear on the frame after having applied the picture. It would be useful passing a vacuum cleaner brush on the top surface of the glass especially along the internal perimeter of the frame. The aspirator is not only not a well known piece of equipment amongst framers but is also not taken advantage of. In fact it can be useful at various stages of the framing.
A more orthodox system, even though slower, would be to clean the sheet of glass outside the frame.
In order to control that the cleaning has been performed well, just lift the sheet and look at it against the light against a dark background.
The Rinaldin has designed and built a very functional tool for cleaning the glass: the extensible support.
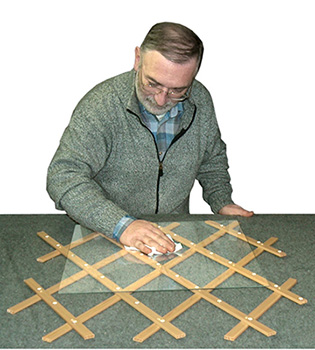
The extensible support
The use of the extensible support is fully explained in the video that you can see by clicking here