The joining of the frame is the most delicate part of framing. The article, useful only for beginners, points out the different ways to join the frame without an underpinner.
We will show only the joining methods that do not require the use of professional equipment.
However as the workload increases, more professional methods are needed.
The different joining methods for beginners are:
• With nails or wedges
• With a frame tightener
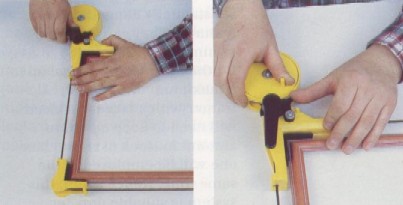
Joining with rubber bands
A workbench with a raised border of about 5 mm is essential. Proceed as follows:
• Glue the two pieces of moulding. There is no need to apply a lot of glue, but it is important to cover the whole area. Normal vinyl glue can be used although a glue with higher adhesiveness is preferable. Softer woods adhere better as the glue penetrates the "pores" of the wood.
• Once you have glued each of the four sides of frame, lean one of the longest sides against the raised edge of the bench.
• An appropriately sized rubber band or ring is placed around the frame to tighten it.
• The rubber band is placed around the longest side, opposite the one leaning on the raised edge (step 1).
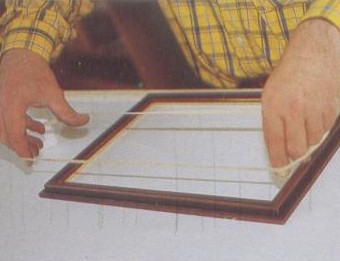
Step 1
• The rubber band is then pulled towards the framer along the two vertical sides of the frame (step 2)
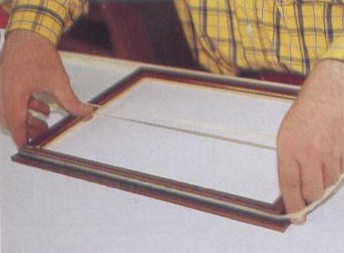
Step 2
keeping the thumb and index finger firmly against the frame in order to keep it stable (step 3).
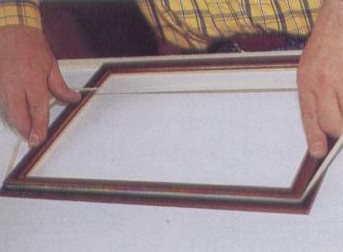
Step 3
• The rubber band is finally wrapped around the closest edge (step 4)
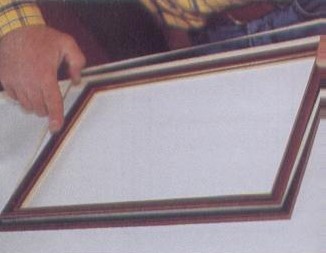
Step 4
• A heavy weight can also be placed on the long side of the frame for further stability.
• Now it is a matter of waiting for the glue to dry. This can vary from anywhere between 1 to 4 hours. It depends mainly on the room temperature and the type of glue that has been used. In summer, glue dries faster.
This method is not suitable for all frames. The ideal frames are those that have edges with a certain profile that allow the rubber band to sit nicely around the frame. Those mouldings with round or non existent profiles are not suitable.
The two main types of rubber bands are latex rubber or para rubber ones. Latex bands are able to stretch about five times their natural position, but are rather expensive. Para elastics stretch to about twice their natural state and are much less expensive.
Joining with nails or wedges
After the frame has been glued, greater rigidity can be given to it by using nails or wedges. Glue is usually not sufficient. Nails or wedges keep the frame together even if the corners are separating.
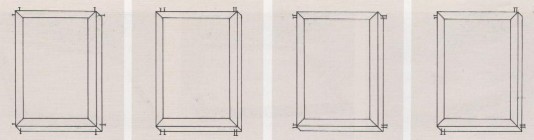
Figure1 Figure 2 Figure 3 Figure 4
The nails should be inserted into the part of the corner that is least visible as possible such as a carved in part of the moulding. A clamp is vital while performing the nailing.
Two nails are obviously more solid than one. If using two nails, the following three possible alternatives each have their advantages and disadvantages:
1) it is probably the most aesthetically pleasant solution to insert both nails into the two horizontal sides of the frame. It is however the worst solution for solidity, as the weight of the picture and the glass exert downward gravity pressure thus pulling the corners apart (figure 2)
2) greater solidity is obtained if inserting the nails into the two vertical sides but its aesthetic appearance will suffer (figure 3)
3) if opting for a combination of the two above solutions, the main advantage is that you have not to think too much about where he insert the nails (figure 4).
The length and thickness of the nails depend on the type and dimensions of the wood. It is advisable to use a thin steel nails instead of iron. It is also worthwhile putting oil, solid or paraffin wax on the tip of the nail in order to lessen the possibility of the nail bending whilst being inserted. You should hammer into the frame but stop before the nail is entirely inserted. In order to avoid damaging the frame you should use a nail punch to push the rest of the nail in.
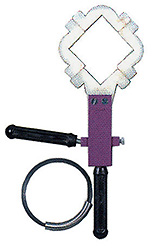
Frame tighteners
It is a piece of equipment made up of a string that is placed around the frame and a handle pulling mechanism that pulls the string until it reaches a sufficient tightness. It is basically a variation to the rubber bands method. The four sides of the frame are to be glued and fixed with nails or metal wedges.
Two stages whilst joining with the frame tightener
There are various types of frame tighteners on the market. They differ mainly because of the type of string (plastic, fabric fibre or metal). The pulling mechanism can be made from either plastic or metal with consequent differences in duration and resistance. All frame tighteners should have protective plastic corners to avoid damaging the frame. Some tighteners have hexagonal or octagonal "corners" whilst others have hinges that allow the angle of the corner to vary, making it suitable for various frames. The length of the string can vary from 2 to 5 metres.
Their price can vary quite substantially depending on its features. They range from a minimum of £ 20, for the most simple types, up to a maximum of £ 80. You need a certain quantity of tighteners as more than one will be employed at the same time.
The frame tightener supplied by Rinaldin company (code 754)