Gilding
The purpose of this article is to give some basics of gilding. The article is deliberately schematic to facilitate comprehension.
Rinaldin has also created a series of 11 videos about the gilding you can see by clicking here

We are giving thereunder a short synthesis of the various methods of gilding, which will then be analysed in detail in the following pages.
Water Gilding
First you must apply a few layers of gesso and some layers of bole. Then you must apply the leaf, wetting the bole in order to make it sticky. You can use leaves of real gold, silver, or imitation leaf. Then you burnish with an agate.
Water gilding is not indicated to resist in the open.
Oil Gilding
This is a gilding suitable for all types of stands: wood, metal, stone, carton, plastic, etc. First you must give a coating of solvents. When this coating gets sticky, the leaf must be glued (real gold or imitation). The leaf cannot be burnished with an agate. It is suitable for external gilding, because it does not get damaged if it is wetted.
Water size Gilding
The process is the same as above with a difference that water is used (a very rapid process). This can be used only for interiors and cannot be applied on metals and cannot be burnished.
Cream gilding
The basic system is similar to that of the water gilding and that is, with the application of gesso and bole. But in this case, the bole must not be done to water but to the solvents. Instead of leaves you use wax creams Any material could be gilded. Burnishing could be done with an agate stone or even the shine could be given with a piece of cloth.
Liquid gilding
This process is similar to that in cream, but instead of creams, a liquid with acrylic resin base and bronze powder is used. This gilding is more indicated for non-porous materials like marble, stone and metals.
Kölner System
This is a new system which gives the same results as the water gilding process with shorter preparation periods and using different types of materials.
Water Gilding
This is a very old system and it is this system which gives the best results, whether a leaf of gold sequins or gold imitation is used. Its name comes from the French word 'gauche' as before applying the leaf, you need to wet the bole.
Dabbled gilding is above all complex, as it requires many stages of preparation which must be carried out without errors to guarantee a successful job.
The working phases could be classified in the following manner:
1. Gesso application
2. Bole application
3. Leaf application
4. Finishing
Let us now examine the various phases.
Gesso application
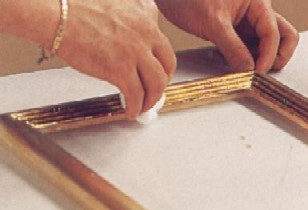
On the surface to be gilded gesso must be applied. Its function is to close the pores and to prepare a hard and smooth surface for other operations to be carried out. It could also be used to fill the wood openings or to re-construct certain parts of the item to be gilded. Gesso constitutes the basis of the water gilding system; but in some cases it could be useful also in the gilding coatings. Various type of gesso are to be found and these are: Meudon White, Spain white, and the gesso from Bologna. This gesso must be mixed with a substance made from rabbits' skin in the proportion of 2 parts of gesso and one part of glue. The function of the glue is to stick fast the gesso to the wooden support. The glue made from rabbits' skin is normally sold already cut fine or in the form of pearls (photo 1).
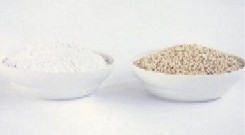
Photo 1. Gesso and rabbit's skin in pearl shape
It is put in water (in the proportion of 100 GMs for every litre of water) for a night until it rises up and gets a gelatine aspect.
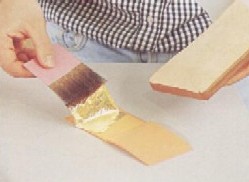
The paste obtained from a mixture of gesso and glue is heated up in a water-bath during use, in order to retain the right fluidity and put to dry in layers, utilising a suitable brush.
The brush for the gesso application has the bristles manually fixed to the handle with a twine thread. If the ring was in metal, it would easily get rusty with gesso contact. The following oxidation would take place if the leaf had been applied. The brush for the white bole is available in different sizes. After use, the brush could be washed with hot water (photo 2).

Photo 2. Brush for gesso application
If the paste becomes very dense it can be diluted in a spoon of water. The paste must be constantly kept warm, but it must not be boiled, otherwise certain bubbles could be formed and this point must be taken into consideration while laying out the gesso, stretching the brush in a uniform way, continuously, methodically, without making holes (photo 3).
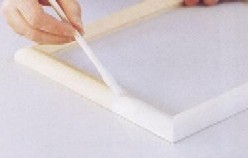
Photo 3. Gesso application
The first gesso layers are at once absorbed by the wood. In order to apply further layers, it is necessary to wait until the gesso is dried, but not completely essicated, otherwise it will stick with great difficulty. It must be noted that the subsequent layers will dry in a very short time. It is preferable to avoid accelerating the drying process artificially, putting the frame near a heat source, as this would cause cracking.
The number of layers to be applied depends on the type of gilding. For the gilding a coating of three layers is sufficient. For the water gilding, the layers instead must be at least 5 or 6, as the surface must be perfectly smooth and the wood rugosity must not appear absolutely. After applying all layers, it is necessary to smooth with an abrasive fine leaf (photo 4)
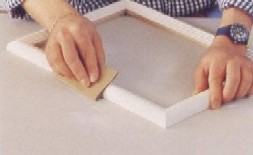
Photo 4. Smoothening with abrasive-paper
and following this with a steel leaf '0000' (photo 5).
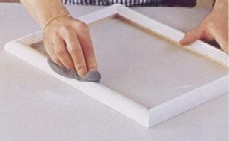
Photo 5. Smoothening with steel wool
A perfect polishing is determined for the successive operations and in order to obtain a good final result.
The cleaning and polishing of gesso could also be done by rubbing the whole surface with a wet cloth. The cloth must be wetted and squeezed frequently in water, as gesso has a tendency to dry rapidly. Attention must be paid not to wet the gesso too much, otherwise the small carvings and embellishments will be flattened. Attention must also be paid not to round too much the corners. At the end the gesso must appear perfectly smooth as if ivory.
Before going ahead with subsequent phases, it is necessary to wait that the gesso dries completely for 24 hours.
The gesso application to a carved frame or any other object containing embossed details could give an undesired effect of rounding the shape thus losing some carving details. In particular it could happen that the carved parts receive too much gesso. In this case it is necessary to go on with the job of finding once again the original shapes to give the right nervosity to the embossed frames. This job is done with the right instruments: the so-called 'fetters for repairs'.
It deals with pointed instruments in forged steel. Contrary to the instruments used for sculpture which are generally front-pushed, the 'fetters for repairs' are used by pulling towards oneself the instrument (photo 6).
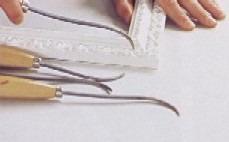
Photo 6. After gesso application it could be necessary to give
the right shape to the embossed frames with 'fetters for repairs'
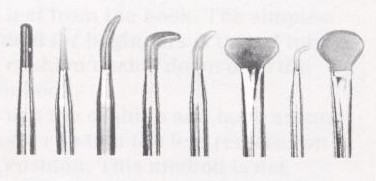
According to the job to be carried out, there are different types: flat pointed, rounded, cats' tongue, etc. (picture 7).
Picture 7. Some points of the fetters for repairs
There is as alternative a more rapid system to substitute the paste of gesso with rabbits' glue. In the market in fact a product can be found ready for use: the bole of white water. It deals with a product with the same traditional ingredients (Meudon white and glue made from rabbits' skin). It also contains certain additional substances to facilitate the conservation. The bole of white water is solid at room temperature and becomes liquid at around 40°. In order to be used it must be heated in a water bath. If one does not have a utensil made for this water-bath, the glass flacon which contains the bole could be emerged in a utensil and the bole could be directly lifted from the flacon with a brush. Coming into contact with the surface to be gilded, the bole hardens gradually. After 24 hours it could be smoothened with abrasive paper or a steel leaf.
The frame application could be done with the same rules as those used for the traditional gesso. The bole of white water is particularly practical when small jobs are to be carried out or when frames are to be gilded (i.e. gilding work which does not require a large quantity of gesso). The traditional paste of gesso and glue remains instead convenient if prepared in large quantities and is therefore advisable for new frames very irregular or to re-construct large parts which are lacking, and in general for restoration work.
Bole application
After smoothening the gesso we can go ahead with the application of the water bole. This is a paste obtained from clay which reacts as a stop-gag and serves to prepare the surface for receiving the gilding leaf (gold or imitation). Its principal characteristic consists in pulling the gold leaf when it is wetted in water.
The bole could be yellow, red or black according to one's preference and the taste of the gilder and the finishing which one wants to obtain. The colour of the bole in fact is partially seen through the gold leaf. Particular effects of antiquity could be obtained by rubbing the gold leaf in order to leave partially visible the lower bole. The choice of the bole colour is therefore important to obtain the desired effects.
In particular one must follow the following advice:
The bole is a semi-solid paste at home temperature and is heated at about 40° in a water-bath in order to be utilised. It is then laid out with two brushes made for this purpose having very long bristles which help to obtain a uniform application (photo 8).
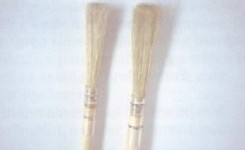
Photo 8. The brush for the bole application
It is better to repeat the application of the bole at least 3 times. The first layer is the most difficult as the gesso is absorbed almost instantly as the bole is laid (photo 9).
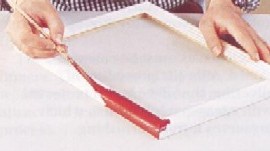
Photo 9. Bole application
If the bole is very dense it is diluted with water and glue made from rabbit's skin. Between one layer and another the frame must be smoothened with sand-paper taking into account that, to carry out this operation, the bole must be perfectly essicated (photo 10).
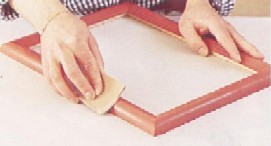
Photo 10. Smoothening of the bole with sand-paper
After drying of the last layer of the bole it is necessary to smoothen the surface with a brush used for this purpose having short and rigid bristles (photo 11).
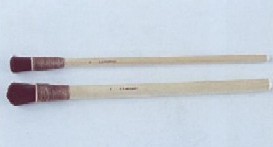
Photo 11. The brush for the bole shine
The brush is rubbed perpendicularly and energetically so as to obtain a surface which is almost specula (photo 12).
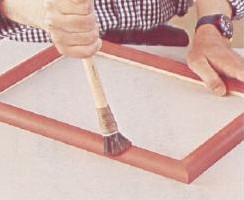
Photo 12. Bole shine with brush used for this purpose
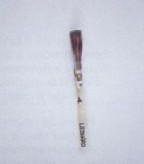
The leaf
The gold sequin leaf is obtained with a traditional procedure of refining with a gold stem which, passing between two rollers, becomes a thin thread and is subsequently cut in squares of cm 8x8. The gold sequin leaf is commercialised in cases of 25 leaves (photo 13).
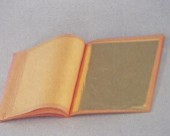
Photo 13. Gold sequin leaf in its book
These are intertwined by a thin paper. The gold purity is expressed in carats. If the gold is pure at 100% it is said to have 24 carats. Gold could be mixed with other metals which confer particular characteristics of colour and hardness. For example the copper gives a reddish colour while silver makes it more pallid. The gold normally used in the gilding is of 22 carats (i.e. it is pure at 92%).
Even the silver leaf is obtained with the same procedure and is packed in small cases of 25 leaves each. Its dimensions are however larger and that is, cm 9,5 x 9,5.
In the market even sequin gold leaves are to be found in packing called "transfer". These are slightly pressed against a very thin paper. The taking out of this case and frame application are facilitated.
Silver is not malleable as gold and therefore it is not possible to reduce the silver leaf to the same thin width as gold. Moreover gold is subject to oxidisation. the leaves are therefore conserved on closure. After the procedure of silvering the silver leaf is protected with a transparent varnish which preserves oxidisation.
The imitation gold leaf and silver imitation is more economic to the sequin or fine silver leaf. These are carved for lamination by a copper string, zinc or tin leaf (or aluminium to imitate silver). These could have different tonalities according to the percentages of various metals which enter into the composition of the binder (photo 14).
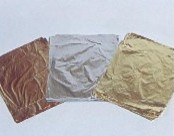
Photo 14. Various tonalities of imitation gold
These are also known as "Schlag leaf" or "Schlag Metal" or "Slagmetal". The imitation leaves are commercialised in various packings (100, 500, 5000 per box) and their dimensions are cm 16x16. These are not separated with pieces of paper. They have a greater width than the gold sequin leaf, but are at the same time difficult to manage. The imitation gold leaf and the silver imitation leaf are subject to oxidisation if exposed to air for a long period of time. Imitation gold is commercialised even in rolls of various widths. The rolls are particularly suitable for the gilding of thin threads on the staffs. The gold in rolls is intertwined with carbon paper which facilitates the twining and application (photo 15).
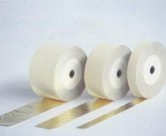
Photo 15. Imitation gold leaves in rolls of various widths
Leaf application
After terminated the bole application one can go ahead with the application of gold sequin leaf and imitation gold leaf.
It is necessary to wet the surface with a brush made for this purpose with bristles of marigold. It is preferable to use normal fresh water. Some gilders dissolve in the water a small percentage of isinglass to make it more sticky. This is advisable specially with leaves having large widths like the silver leaf. Others still prefer a mixture of water, paste and alcohol (photo 16).
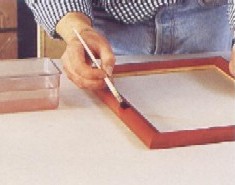
Photo 16. Before leaf application the surface must be wetted with water
Water is absorbed at once by the layer of bole and gesso. It is wetted and brilliant, otherwise the leaf will not stick. It is advisable to keep the frame slightly inclined so that water does not come into contact with the gold leaf already applied.
The instruments used for the leaf application are: cushion for gilding, hair pencil of grey miniver.
This is a small wooden table of about cm 15x25 stuffed with wadding and covered with thin leather. Above the cushion the gold and silver leaves are deposited and cut with a knife made for this purpose. On the three sides of the cushion there is a protective layer of parchment which is used to avoid the penetration of air currents which may uplift the leaves. In the absence of the traditional parchment a paper protection could do well as long as it is resistant in the folds. The cushion in fact when not in use, is re-folded above to avoid that dust settles on it (photo 17).
After a long period of inactivity the protection has some difficulty in remaining rigid in a vertical position. In such a case a rigid cardboard could be inserted on the internal borders (better if it is first passed with gesso to avoid that the gold leaves stick to each other). Under the cushion there could be a kind of belt to allow the gilder to take the cushion in his hand while working as if with a painter's palette.
The gilder’s Knife
It has the shape of a normal kitchen knife and serves to cut the gold leaves above the cushion in the right dimension suitable to the frame which is to be gilded. It could be used even to uplift the leaves from the cushion.
The knife must be sufficiently sharp to cut the leaf, but not too much as to cut the cushion leather. The length of the blade must be at least 16 cm ( i.e. the size of the imitation leaves). Naturally it must be heel free along the length of the blade otherwise the leaf cannot be cut well. Periodically the knife must be sharpened with a stone used for sharpening.
Attention must be paid not to touch the blade of the knife with fingers. The oiliness of the skin, which would remain on the blade, would pull the leaf during the cutting process. (photo 17).
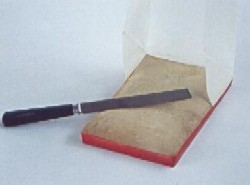
Photo 17. The cushion and knife of gilders
The gilder’s tip It is a flat brush fixed between two cardboards that serves to uplift the leaf from the cushion and to deposit it above the frame to be gilded. The hair most indicated is marten, squirrel or camel. The yew-tree hair would do well only for the imitation leaf. There are various dimensions according to the leaf dimension which is to be uplifted. It would therefore be useful to have at one's disposal several tips of different dimensions so that one can choose according to the necessity of the moment. The tip must be at least 1 cm larger than the leaf. The tip is not suitable to uplift the whole gold imitation leaf because of the dimensions of the leaf. In fact tips of such dimensions do not exist. Photo 19. Uplifting of the leaf from the case using the flat brush If the leaves curl up while placing them above the cushion it is necessary to uplift them with a knife and turn them on the other side turning the handle of the knife. To remove the folds which are formed it is necessary to blow delicately in the centre of the leaf to create a series soft undulations from the centre towards the exterior. Photo 20. How to place the leaf on the frame After this operation certain parts could be found which have remained open and it would therefore be necessary to carry out the 'darning' process which is carried out by wetting the bole which has remained open and by applying small leaf fragments with a brush for the 'darning'. This means a very small brush made of squirrel bristles (photo 22). Photo 22. The brush for 'darning' It is very important that during all phases of gold leaf application, the working place must be without dust otherwise this would attract the wetted bole and could cause interposition between the leaves and the surface. One must avoid above all air currents not to make the gold leaves fly during the working process. The temperature must be maintained at around 20 degrees. Photo 23. Some types of burnishers According to the gilders taste, the bright parts and the opaque parts could be alternated, i.e. those which are not to be obviously polished. A pleasing gilding is the result of a right harmony between the bright and opaque parts. Photo 25. Ageing process with Giudea's Bitumen. First it is applied to the frame... Photo 26. ...and then it is removed from the more exposed parts It is a gilding method more rapid and easy to learn than the dabbled gilding, but with less brilliant results. The paste must be uniformly spread and above all it is necessary to avoid obtaining different widths in the various areas of the surface and the forming of clots, as the drying period could be different in the various areas of the frame. At the end of a session it is better to throw the paste remaining in the plate as it would attract too much dust. It is very advisable even to protect from dust the surface already treated, covering it with a type of curtain or putting the frame in a vertical position. The greater the number of layers applied, the greater will be the covering of the lower colour of the bubble. The cream will be essicated in about an hour, then we can proceed with the polishing with the same process as seen in the dabbled gilding. In the absence of the polisher the wax could be given a shinning effect with a soft cotton cloth but not hairy (photo 30). Photo 30. Application of cream for gilding
Liquid Gilding
How to handle the leaves
The leaf is deposited on the cushion which is cut with a knife in the most suitable dimension required for the frame mould. Then it is applied to the frame to be gilded. If the leaf is applied without being cut it is not necessary to deposit it on the cushion. It could be directly transferred from the frame-case.
To uplift the leaf from the case there are various systems. The most simple, for the beginner, is that of turning the cushion upside down on the open case; upturn once again the cushion and case together in such a way that at the end, uplifting the case, the cushion remains on the leaf. This is not however a method advisable if not for the first clumsy exercises of gilding.
Another method: open the case on the bench; place the knife blade above the central part of the leaf and push slightly so as to keep it firm; blow softly from a certain angle so that the free part of the leaf is re-folded above the knife; upturn the leaf with a knife and transfer it on the cushion (photo 18).
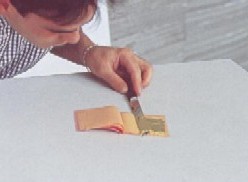
Photo 18. Blowing, the leaf bends on the knife
Third method: turn in a rounded motion the case and leave it. Repeat the operation many times until when the leaves come out slightly from the case. At this stage you can uplift one or more leaves with the tip (photo 19).
If inadvertently the leaf blows away from the cushion or from the case, do not try to hold it at once. Wait and do it slowly and then uplift it with a knife and deposit it on the cushion.
To uplift the leaf from the cushion a tip is used after having rubbed it on the face and on the hair. The oiliness of the skin is in fact sufficient to make the leaf attracted by the brush as soon as it nears the leaf.
If your skin is very dry, put some vaseline on your cheeks but without exaggerating. If the palette becomes very oily you cannot easily deposit the leaf on the frame. The palette is brought into contact with the leaf until 1 cm. The leaf is attracted by the oiliness of the hair of the palette and sticks to it. The leaf is then delicately deposited on the frame and overlaid on the previous leaf for about 3 mm. This is a very delicate operation which requires a certain experience (photo 20).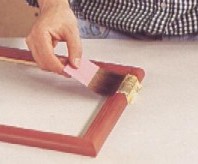
As soon as the leaf is deposited, you will notice certain bubbles which could be constructed from an air sack or from a drop of water. In this case the bole will absorb water in a few minutes after which it will stick by itself on the bole. If instead the boles are made of an air sack, it is necessary to eliminate it passing over with a brush made for this purpose.
This would require a very soft brush better and to make eventual air bubbles come out which could remain under the leaf. It is not easy therefore to understand for which of the two reasons these bubbles are formed. If the bubble contains water and is treated by pressing it with a brush, the pressure would make this bubble burst and the water coming out would damage the leaf. The solution preferable is to wait for some minutes while one can go ahead with the application of the subsequent leaves. If it deals with bubbles of water these will go away by themselves; if instead we mean bubbles of air these will not disappear and therefore must be eliminated with a brush used for this purpose. It is necessary to avoid that the leaf forms kinds of small 'bridges' which stick only to the parts more exposed of the frame so as not to cover parts more extensive only with one leaf.
Only after an hour of leaf application one can carry out the brushing, i.e. the operation with which all pieces of leaf are removed which are overlapping or which are not attached to the frames. The brushing is carried out by softly rubbing the frame with a brush to remove the air bubbles or with a piece of velvet soft cloth or fine steel leaf (photo 21).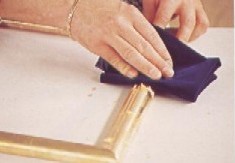
Photo 21. The brushing with a piece of velvet cloth
The burnishing
After 12 hours of leaf application, but before 24 hours, one may proceed with the 'polishing'. This phase however is only indicative and can vary according to the dampness, the temperature, the quality and the quantity of the bole applied. By polishing, in the language of the gilders, one means the polishing of the leaf. Polishing is carried out with the right instruments: the burnishers in agate stone. There are different shapes and dimensions according to the frame mould or of the article which is to be polished. The agate stones are fragile and could break easily, if they fall, therefore attention must be paid while working with these (photo 23).
The polishing, i.e. the shining of the surface, is obtained by rubbing the agate stone on the frame several times until the desired shine is obtained. It is advisable to start with a slight pressure of the hand and intensify gradually the pressure. To reduce the friction of the burnishers on the leaf, before polishing, a thin layer of wax could be applied, which must be removed after the polishing (photo 24).
Photo 24. Burnishing with agate stone
Finishing and ageing
At this stage several finishings could be added to the gilding. The ageing procedure is often very personal and depends on inspiration, on the inventive and gilders taste. A method of ageing advisable seems to be obtained with the Giudea's Bitumen. This is a semiliquid product, very rapid in essication, which, after being applied to the frame, is immediately removed with a piece of hydrophilous cotton in such a way that it remains in greater quantities in the more carved parts. Thus an ageing varnish is obtained which is more realistic. To obtain the ageing effect one can use even other products like 'shaded [1]'land', tar, mordant, and so on (photo 25 and 26).
A method which is sufficiently used consists in spreading a mixture of ashes and glue in the more carved parts of the frame and in the inlaid parts. The ashes could be of wood (of whitish colour) or of metals (typical rose colour). Another method which is used for ageing the frames is the flaying. The frame is energetically rubbed with a steel leaf (the type of grain used varies according to the type of flaying which one must obtain); the parts of the frames which are more outstanding are left open to the naked eye, leaving space to see the colour of the underlying bole and thus creating colour contrasts.
Varnishing
At times it is advisable to apply a slight layer of transparent fixing varnish to protect the leaf against small scratches and of oxidisation. In fact the gold sequin leaf does not need to be protected as its surface has a notable resistance to abrasion and to atmospheric bodies. The varnish also reduces the typical brilliancy of the gold. The varnish instead is indispensable when a silver leaf or imitation leaf is used, as in these cases, it serves to protect the gilding of the oxidisation.
To apply the varnish it is necessary to bear in mind the following precautions for the leaf application. It is absolutely necessary to avoid that together with the varnish, dust is also gathered. The brushes must be perfectly cleaned and must nor lose hair. The most suitable brushes for this operation are of marten, but even those of oxen. It would be better to keep in a vertical position the frame to be varnished to reduce the quantity of dust which is deposited. It is even advisable not to wear woollen clothes or clothing which loses fur.
The essication period of the varnish is about 24 hours (photo 27).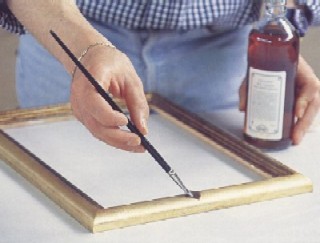
Photo 27. Varnishing
Oil Gilding
The difference between the dabbled gilding and the gilding with solvent paste consists above all in the fact that the dabbled gilding could be damaged, if wetted, while the gilding with solvent paste is water resistant and therefore could be use for the gilding in the open. The disadvantage of the solvent paste gilding is that it cannot be polished with an agate stone.
The solvent paste is a type of sticky varnish which could be applied on all stands, including metallic stands. It is suitable both for the gold sequin leaf or the imitation gold leaf and is particularly suitable for the gilding with metallic powder.
Preparation
The preparation phase consists simply in smoothening and cleaning the frame. All the defects and irregularities of the surface are greatly evidenced after the gilding. If the wood is raw and porous, it is advisable to spread a layer of white bole with water and to smoothen subsequently the surface with sandpaper or fine grain.
The solvent paste
The solvent paste is basically made of oil of cooked flax with the addition of a drying agent, traditionally a lead oxide. The drying agent has the function of shortening the drying period of the paste after its application. The greater the percentage of the drying agent in the mixture, the more rapid is the drying period. The types of solvent pastes in the market are classified in fact on the basis of the essication period and exactly: 3 hours, 6 hours, 12 hours, 16 hours, 24 hours. This means that the leaf is applied after 3 hours, 6 hours, etc. The best results are obtained with solvent pastes which require long periods of drying, even if this means a greater risk that the treated surface is full of dust. It would however preferable to have a working room without dust. It is also necessary to keep in mind that the greater the period of essication, the greater the period during which the solvent paste is in the ideal state for being applied to the leaf: pastes 'long' allow the gilder to work without interruption for some hours, which the paste remains sticky. It is on the basis of these considerations that the gilder must schedule his work.
The types of pastes for rapid essication (3 hours or 6 hours) are more indicated for the open gilding process while the types used for long essication are specially used for internal gilding. The open gilding is carried out in fact in short periods of time whether for practical reasons or because of the risk of attracting too much dust. For internal gildings instead one could schedule work differently; one could apply, for example, the paste in the late afternoon and apply the leaf the next morning.
The atmospheric periods influence the drying period; dampness and cold lengthen these, on the contrary, the heat reduces these. The indications given by the supplier stamped in the pack are to be carried out with a certain elasticity.
It is possible to mix different types of paste which have different types of essication to obtain a paste with a new period of time which in fact, the average time well examined, between the periods of the solvent pastes in the mixture. It is not however advisable to mix pastes of different producers. The periods of time of one operation could be lengthened even by adding oil of cooked flax.
The paste application
The oil paste is applied with a brush made of oxen hair or of pigs hair. For flat surfaces it is preferable to use a flat brush while for carved surfaces for small objects, it is advisable to use a rounded brush (photo 28).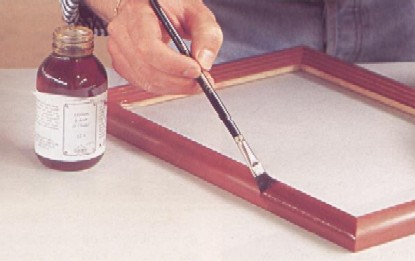
Photo 28. Application of paste to solvents
The beginner often applies the leaf too early, because he is afraid to loose the right time. In this way thus the leaf will appear opaque. Moreover drying will be longer, because of less of air and the leaf will be very delicate, laying on a still soft surface. There is the risk in fact to see the fingerprints left on the leaf.
Expert gilders actually take advantage of this characteristic of the leaf, that becomes opaque, when applied in advance, when they wish to create different shades of colours.
The beginner must not have the temptation to touch the solvent paste to check if it is sticky because this will leave the fingerprint also after drying. It is advisable instead to bring your hand next to the solvent paste so as to make the hairs attract from the sticky substance. An expert would say the exact sticking of the paste from its grade of lightness: the more it dries, the more it becomes opaque.
Application of the leaf
We have seen it is possible to use either the gold sequin leaf or the imitation leaf.
The gold sequin leaf will not oxydate, while the imitation leaf, being a mixture of different metal alloys, tends to oxydate and therefore needs to be protected from a fixative substance.
The way to apply the leaf is the same as for the dabbled gilding.
Water Size Gilding
The gilding with water paste (called also Wunda Size or W.S.) could be used only for interiors; this could not be applied on metals and cannot be polished. The only advantage in respect of the gilding with paste to the solvents consists in the fact that the leaf could be applied after only 15 minutes. Therefore this is a system which is preferred when time is very limited. For its practicability it could be used even to re-touch the gilding carried out with other systems.
The water paste could be diluted with water and could be applied by a suitable brush. The leaf is applied when the paste is sticky. The cutting system and management of the leaf is same to that of the dabbled gilding.
With the process of the gilding with paste (whether to solvents or water) we have seen that it is not possible to carry out the leaf polishing. It is instead possible to give antiquity to the frame with systems already seen in the dabbled gilding process. In the end it is advisable to protect the gilding with a varnish with is fixative.
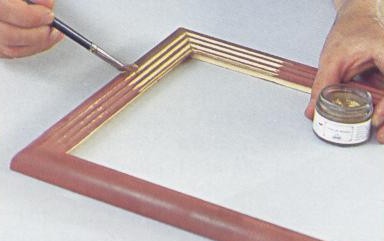
Cream Gilding
This This consists in using the cream instead of the gold leaf. This could be used for gilding any material (wood, metal, carton, plastic, ceramic, etc.) and is a gilding process which could be convenient in some cases for its rapidity and practicability.
The basic process is similar to that used for the dabbled gilding and provides, that is, the application of gesso and bole. In this case, however, the bole must not be to water, but to solvents. The colours of the bole to the solvents are the same as those of water bubbles and that is, red, yellow, black. The brush for applying the bole to solvents is the same as used for the water bole. The bole to solvents however, does not need polishing. At the time of its essication the cream is applied with a brush not very rigid or with the same brush used for the application of the water bole.
The cream to gild is a material made with a fattening wax and metallic powders, and has a pasty appearance and is available in the market in various gold and silver tonalities. In the catalogue 'Rinaldin' there are eight tonalities of gold and silver (products of the French house 'Liberon') identified with names of other French houses. The colours could be mixed between themselves until the desired tonality is obtained (photo 29).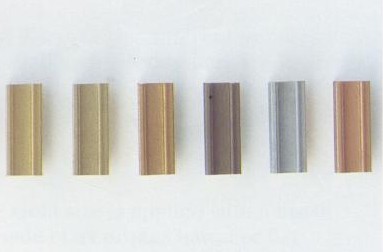
Photo 29. Various tonalities of creams for gilding
The cream gilding is useful principally in the following cases:
This procedure is similar to that of gilding in cream, but instead of cream a liquid, made from acrylic resin and bronze powder, is used. In the Rinaldin catalogue there are eight tonalities of gold and silver which correspond to the same tonalities of cream. It is possible to mix colours to obtain the desired tonality. It is the gilding best indicated for non porous materials like marble, stones and metals. This could also be used for porous materials but in this case it is better to apply first the white bole liquid to obtain a more smooth and brilliant finishing. The liquid gilding is suitable for gilding those parts of frames which are carved where it is easier to penetrate with a liquid rather than with a pasty material like cream. For its rapidity and limited cost it is also indicated when one wants to gild surfaces which are very extensive and flat. In the end it is suitable if in the same frame certain parts are to be brilliant and others opaque. The brilliant parts could be obtained with a gold leaf and the opaque parts with a liquid gilding. It is advisable to shake well the flacon before use to make the liquid homogenous.
Kölner System
The The traditional gilding method has not undergone substantial changes in the course of 4000 years. In the last few years however certain systems have appeared in the market in alternative to the traditional system. One of these is the Kölner system invented by the German Paul Brauer. The Kölner system proposes to obtain the same results as the traditional system reducing however the working period required.
Surface preparation
As in all systems of gilding the surfaces to be gilded, whether it deals with wood or other materials, must be perfectly smooth. All holes and defects must be closed with plaster or better with a special obstruction called Kölner Reliefkit. The surface then is smoothened with sand-paper, that is always finer in order to obtain a perfectly smooth surface. Instead of gesso mixed with rabbit's glue, used in the traditional gilding process, the Kölner system uses a seal made for this purpose, called "123A", which is diluted with water. The water percentage to be added could vary according to the type of wood to be gilded, but on the average in the same quantity as "123A". When the seal is completely dried (about 2 hours) the surface is smoothened with a very soft brush until a satin brilliancy is obtained.
Application of bole paste
The bole Kölner is available in seven tonalities which could be mixed among themselves to obtain the desired tonality. This could be taken directly for use from the bottle, but it would be preferable to pour the desired quantity in another vessel. The bubble paste is re-mixed before use in order to be homogenous, trying not to produce foam. If it is too dense it could be diluted with water. The bole Kölner is passed 5 or 6 times.
We could begin with three layers of white bole Kölner paste; then we could apply some layers of yellow bole paste if one intends to gild with gold: eventual small spaces which remain open are not so noticed. At the end we could apply a layer of red bubble paste. The bubble paste is then smoothened with sand paper 400 or 600, paying attention not to remove the bubble paste. At the end use a steel leaf 0000 (type Liberon).
Leaf application
The application of the leaf is similar to the traditional method with a difference: instead of normal water to make the surface sticky a liquid solution is used, the Colnasol Gel Concentrate diluted in hot water. The solution is spread on the whole surface and the leaf is then applied as in the traditional method.
Polishing
Even the polishing is similar to the traditional polishing and is carried out with burnishes in agate stone. It is necessary to wait for at least 2 hours after the leaf application before going ahead with the polishing, otherwise the leaf has a tendency of coming away. It would however be preferable to wait for a longer period. The polishing effects are obtained even if this process is carried out months after the leaf application. Attention must be paid not to press too much the burnisher so as not to damage the leaf. With the Kölner system in fact a slighter pressure is required than that used for the burnisher.