How to add value to an object. We provide four different framing solutions for this icon.
This month we have chosen a Russian icon to be framed. It is made from brass and has a bas-relief that displays religious type images. The icon was once the central part of a triptych. The two side parts, that once acted as small doors, were hinged down to the two sides. This allowed the icon to remain vertically flat to the surface.
The customer's one and only request was to add as much value to the icon as possible.
As the icon had turquoise varnished parts, we choose a colour for the mountboard that would highlight this tonality. We went for grey (going onto blue) for both the backing and the mount. Both were taken from the Moorman's suede series range. The mount was further highlighted with a gold fillet (Splendorlux gold from Fedrigoni). The frame was a rather classical warm gold (going onto bronze). It also contained some azure strips that emphasised the tonality of the varnished areas of the icon. As the icon had a thickness of 1 cm, a spacer was used to separate the mount from the glass.
The most creative and distinctive part of the framing was without doubt the mount aperture. The objective was to highlight the icon's profile and at the same time add value to it. Four solutions were suggested:
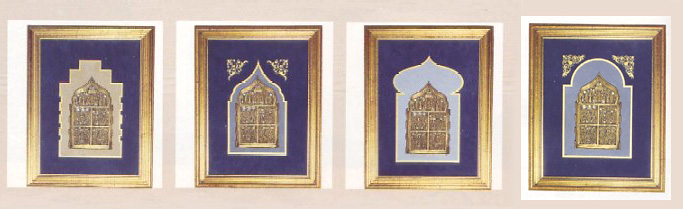
Solution 1 Solution 2 Solution 3 Solution 4
Solution 1
The shape was a series of straight lines that followed both the outer shape of the icon and in particular followed the outer shape of the hinges on each of the two vertical sides.
Solution 2
The top part would have a Byzantine type shape aperture and was obtained by marking the profile with a freehand pencil. Two gilded decorations were added to the two sides.
Solution 3
The dome had the typical shape of a Muscovite church. There was no better way we thought to highlight the icon's origins. The particular cut of the dome was obtained with an oval cutter. The dome was actually an oval onto which a pointed shape was added.
Solution 4
Round top profile. First step was to cut a round aperture with our oval/round cutter; then a rectangular window was cut. The top half of the round was used and this obviously made up the rounded top dome. Two gold ornaments were applied to the two sides of the dome.
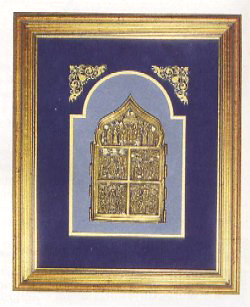
Solution 4.
The one chosen by the customer.
All the various solutions were photographed for the article and were then presented to the customer. By the way she settled on the last solution.