Moulding cutting is the most important part of framing. If the cut is defective then all successive operations will suffer.
The saw or the guillotine?
There are two ways of cutting mouldings; either with an electric circular saw or with a guillotine. Some mouldings cut better with a saw whilst others with the guillotine.
The cut with a saw is performed in two stages. In the first, one cut at a 45° angle is executed. Only then can the second opposite 45° cut be performed. The cut with a guillotine, made by exerting foot pressure on a pedal that lowers the two blades, contemporarily cuts two 45° angles. The saw is more suitable for cutting thicker mouldings, aluminium coated mouldings, mouldings with inlays or mouldings that have particular profiles. The guillotine is more suitable for all other types of mouldings. The ideal of course would be to have both.
What can we suggest to a framer that has not got the financial means or space to purchase both? For various reasons he should probably prefer the guillotine. The advantages of guillotines over saws are as follows:
|
• |
|
They don't create dust. |
|
• |
|
There is no noise. |
|
• |
|
There is no power consumption. |
|
• |
|
In most cases they perform a smoother cut. |
|
• |
|
The cutting time is quicker than with a saw (except for thicker mouldings). |
On the framer's behalf there is however a certain amount of scepticism towards the guillotine particularly if he/she is yet to try it or yet to see it in action. The beginner generally has a preconceived concept over the guillotine. It is generally believed that it is only suitable for cutting thin mouldings and that the final result is rather poor. It is a misconceived notion that the guillotine tears the mitre. Unfortunately the beginner, to his detriment, sometimes doesn't even consider the guillotine as an option.
If you are this type of framer then you should ask for a free demonstration of both pieces of equipment from your local supplier or from an exhibitor at the next exhibition you attend. This is probably the most economical way for you to free yourself from these pre-conceived ideas.
There are various types of saws and guillotines on the market that vary in features and price. There are generally two types of saws; a single bladed (mono-blade) saw and the double bladed saw (that contemporarily performs two 45° cuts just like a guillotine). There are three types of guillotines; manual (foot pedal), pneumatic and electric.
In this article we will examine circular saws in more detail. Guillotines will be looked at in other article.
The electric circular saw
We have seen that there are basically two types of electric saws. The single bladed one is without doubt the most popular. It is used by most framers. It costs about a 1/4 of that of a double bladed saw. There are various types of single bladed saws. Not all, however are suitable for the framer.
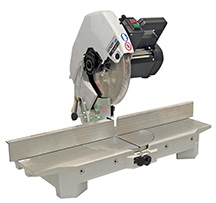 |
| Electric circular saw Omga "1P300" |
| Click here to watch the video |
Sometimes the beginner attempts to use a saw that is more suitable for carpentry type work. These types are not advisable and should be replaced with a more professional one. A circular saw should possess the following features in order to be suitable for cutting mouldings:
|
• |
|
Have a rotating table so that the moulding can sit in a balanced manner. |
|
• |
|
Be able to cut mouldings at 45° angles up to 10 cm (4") thick. |
|
• |
|
Possess supporting planes with measuring scales up to 1 metre long together with raised borders. |
|
• |
|
Have a 45° stop. |
|
• |
|
Should be rather solid. The body should be made almost entirely from cast iron or steel but not from aluminium. The parts that are more subject to wear and tear and breakage should be in metal and not plastic. |
Other less important features that are handy for it to have is an ability to exchange from one cutting position to another; a pedal for blocking the mitre and a motor saver that avoids the motor overheating when the machine blocks. It is indispensable that the saw is attached to an aspirator in order to remove all saw dust. A plastic or metal transparent safety guard always comes with the saw. This raises itself automatically when cutting and lowers itself at completion of the cut. Safety rules and regulations are becoming more severe and only recently the European Economic Community (EEC) raised minimum safety standards further.
Useful hints for the beginner
The working area of the saw should be at least 3 metres long. It should be placed at the right or left of the cutting block depending on the framer's preference. The framer could avoid purchasing it by making it himself. Even a tripod or easel on which the moulding could slide along would be fine. It is essential that the moulding has a support so that the operator's other two hands are free during work.
One is required to action the machine and the other to firmly hold the mitre during cutting. The moulding would simply fall without the support.
Another small hint is to position the moulding according to the rotating position of the blade. It should be positioned so that the blade enters into the back of the moulding. Only saws that possess diagrammatic working planes (such as the OMGA) are able to choose between the two types of cuts. For double bladed saws this problem has been eliminated because they are actually designed to rotate in the most suitable manner.
Double bladed saws generally have notches on the rotating table in order to facilitate diverse angled cuts. This way hexagonal, octagonal and other cuts can be obtained.
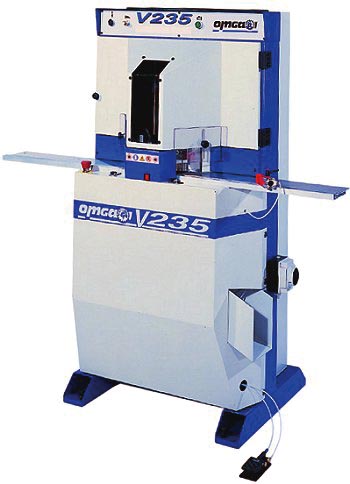
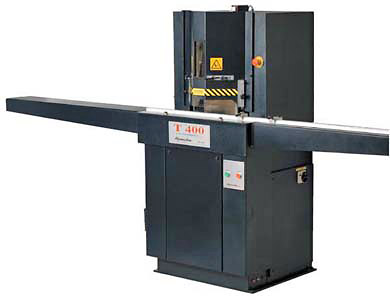
The double bladed saw
This saw's main feature is to have two blades that contemporarily cut the mitre. The cutting time is reduced by about 2/3. As mentioned before, its cost is about 4 times that of a mono-bladed saw. It also requires more space and normally needs triple phase power instead of mono phase. It should have a powerful aspirator. It is noisier than a single bladed saw and this can create a problem in certain environments. With all these exceptions it is obvious that it is suitable mainly for framers that have a rather constant work load of say 20 frames a day and that possess the necessary space.
The double bladed saw works in a manner that secures safety. Two buttons, distanced between themselves, need to be pressed contemporarily to action the saw. The distance is such that both hands need to be used. This does not allow them to get anywhere near the danger areas.
There are various other features that can be present on a double bladed saw:
|
• |
|
Automatic blocking device during the cutting. |
|
• |
|
Automatic placement and removal of the stop. |
|
• |
|
Electronic placement of the measurements. |
One of the main purchasing considerations to be made is the proportion between the blade diameter and the flange that keeps the blade fixed to the axle. The wider the flange, the greater the stability of the blade, thus reducing vibrations. The wider the flange then the greater the coverage of the blade, thus meaning that the cutting area of the blade is reduced.
Double bladed saws can generally perform only 45° cuts. The TR80 from Edilmec is one exception.
 |
 |
|
| Double bladed saw Omga "V235" | Double bladed saw Alfamacchine "T400" | |
| Click here to watch the video | Click here to watch the video |
Circular blades
The quality of the blade is crucial. It is not worth attempting to be economical on the type of blade. Any defects with the cut are generally caused by the blade and not by the machine. The blade's teeth should be made from tungsten. The most common blade diameter used on single bladed saws is around 30 cm (12"). On double bladed saws it is around 35 cm (14"). The central hole is generally about 30 mm (1 1/5"). Sometimes it can be about 20 mm (4/5"). There are reducing rings that allow the central hole to be transformed from 30 mm (12") to 20 mm (4/5") in order to fit the machine's axle.
The thickness of the blade shouldn't be excessive in order to reduce the moulding wastage. The blade's teeth should be alternate and numerous. There are blades on the market that are more suitable for hard woods or for softer woods. It is probably too much of a hassle for a framer, that cuts both types of mouldings, to continuously interchange. The approximate relationship between the blade's diameter and the number of teeth should be:
|
• |
|
200 mm (8") diameter - 66 teeth |
|
• |
|
250 mm (10") diameter - 80 teeth |
|
• |
|
300 mm (12") diameter - 96 teeth |
|
• |
|
350 mm (14") diameter - 108 teeth |
|
• |
|
400 mm (16") diameter - 128 teeth |
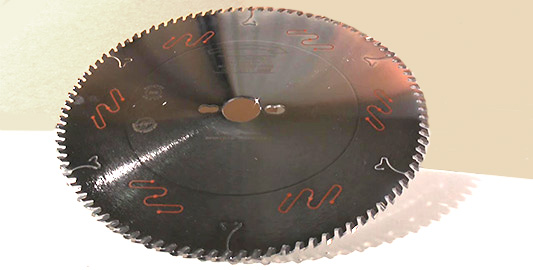
The teeth should be about 1 mm wider than the blade. Some blades have a teflon covered surface to obtain an anti friction effect against the wood. In these cases the teeth are obviously not wider than the "body" of the blade as anti friction benefits would not be obtained if there was no contact with the wood and it would end up being pointless. There are special steel (HHS) blades as an alternative to those made from tungsten that actually perform a better cut but unfortunately wear more easily. They require frequent sharpening (practically daily) and are not advisable.
There are special blades that cut aluminium. They have flat teeth with a particular incline. Special blades exist for cutting plastic. These blades possess the essential feature of having wider teeth than the body of the blade.
This is necessary so that the plastic does not come into contact with the blade otherwise the heat would actually melt the plastic. The teeth need to be alternate (one trapezoidal and one straight). In order to facilitate the cooling down of the blade a wide diameter is advisable so that the teeth have a greater possibility of cooling down between one rotation and another.
The sharpening of the blades should be performed frequently. The money spent on sharpening is easily compensated by an increased quality of the cut thus avoiding retouching of the corners. There are sharpening services in almost all cities and it is a matter of just looking up the yellow pages.
Imperfections of the cut
The most frequent imperfections of the cut are due to the following:
|
1. |
|
Vibrations of the blade. These vibrations can be noticed when the motor has just been switched off and the rotation of the blade is slowing down. The possible causes are:
|
|||||||||||||||
|
2. |
|
Ovalization of the cut. This is due to a gap between the central hole of the blade and the central axle of the saw. If possible, place a reduction ring in the central hole and if this is not possible there is nothing much else to do but to replace the blade. |
|||||||||||||||
|
3. |
|
A cut that is not perfectly vertical. This happens when the central axle is not exactly parallel to the working table. It again could have received a knock. It is worth calling a technician or the manufacturers themselves. |
|||||||||||||||
|
4. |
|
A cut that is not exactly at 45°. If the cut is performed by a double bladed saw then it means that the two blades are not perpendicular to each other. If it is performed with a single bladed saw then it means that the supporting angled bars are not adjusted properly or that the blocking system needs to be regulated. |
|||||||||||||||
|
5. |
|
An oval crack between the two sides of the frame. This can be caused by a few things. It could be the excessive descending speed of the blade or it could be caused by a blade that is too thin or from one made from an inferior quality steel. It could also be due to the flange being too small compared to the blade's body. |
The aspirator
No matter what type of saw you have or are intending to buy you should always have an aspirator. The necessary power required is to be in proportion to the type and size of the saw. It should essentially be able to suck at least 90% of the saw dust. Saw dust is something that is often underestimated particularly by beginners. Dust, apart from being damaging to your health, makes the framer waste a considerable amount of time in cleaning the premises, other nearby machines and materials, the machine and the moulding. After you have acquired the saw we don't advise to set back the purchase of an aspirator.
Aspirators that are suitable for single bladed saws can often be incorporated to sit on the saw's support. A rubber tube connects the aspirator to the saw. Even with double bladed saws the aspirator can be incorporated to sit within the saw's supporting table but it usually is a separate entity due to its size. It is frequently placed on a trolley. The dust neatly accumulates in a sack and the framer only has the relatively simple duty of emptying it every so often.
We recommend beginners to make sure that the power of the aspirator is sufficient. It is not to be taken for granted, that the aspirator which comes with the saw you have just purchased, is in fact sufficient or the most suitable one. We have heard many framers' complaints in relation to this. It is probably advisable to get the manufacturers to guarantee that the aspirator sucks in at least 90% of the dust.
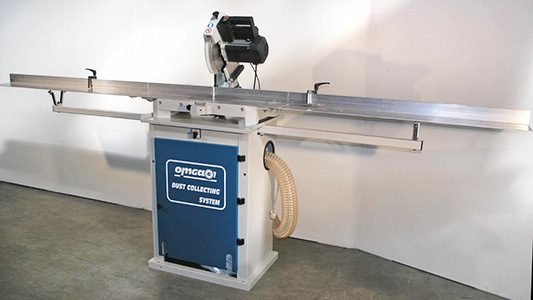
Saw with aspirator and working area
100% would without doubt be better but it is a difficult figure to achieve. We have revealed that double bladed saw manufacturers give little consideration at helping the framer resolve the dust problem. In order to "inhale" in as much dust as possible the following adjustments can be made:
|
• |
|
Increase the power of the aspirator's motor. |
|
• |
|
Increase the various inhaling points within the double bladed saw. |
|
• |
|
Attempt to reduce any possibility that the dust escapes. This can be done by eliminating all openings (apart of course from the area that is required for the moulding to enter and exit the cutting area). |
One last bit of advice. It would be worth making the aspirator come on at the same time that you switch the saw on. This would avoid you forgetting to switch it on.